Would you like to block your agenda for a few hours, a day or a longer period?
The « Unavailability » feature lets you block time slots so they are no longer available for online booking.
You can add unavailability in two ways: from the « Availability » tab or directly from your agenda.
- Add unavailability from the « Availability » tab
- Log in to your Doctoranytime agenda.
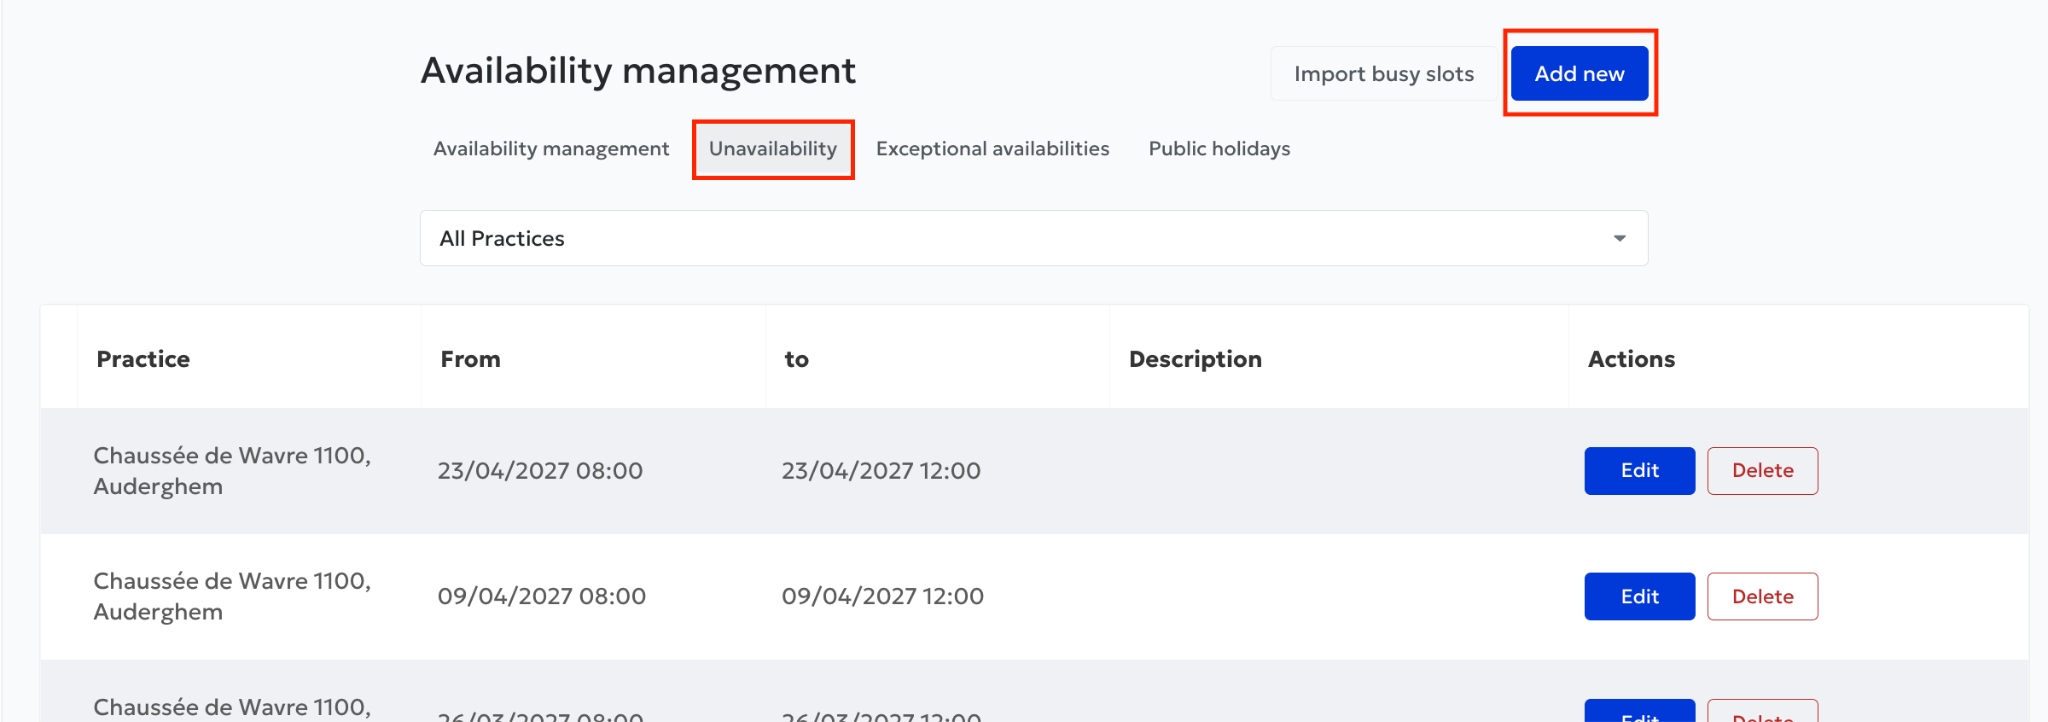
- Open the « Availability » tab at the top right of your agenda.
- Click « Unavailability », just above your practice address.
- Click the blue « Add new » button.
- Select the practice where you want to block time slots.
- Enter the start date and time of your unavailability.
- Enter the end date and time of your unavailability.
Important: enter both the start and end times, not just the dates, to block exactly the period you want.
You can also customize two settings:
Description: add a note to identify your unavailability in your agenda, such as « Leave », « Training » or « Meeting ».
Color: choose a color to identify your unavailability easily.
These two details are only visible in your agenda and are not shown to patients.
- Automatically repeat unavailability
If you regularly need to block the same time slots, you can create recurring unavailability.
To do so:
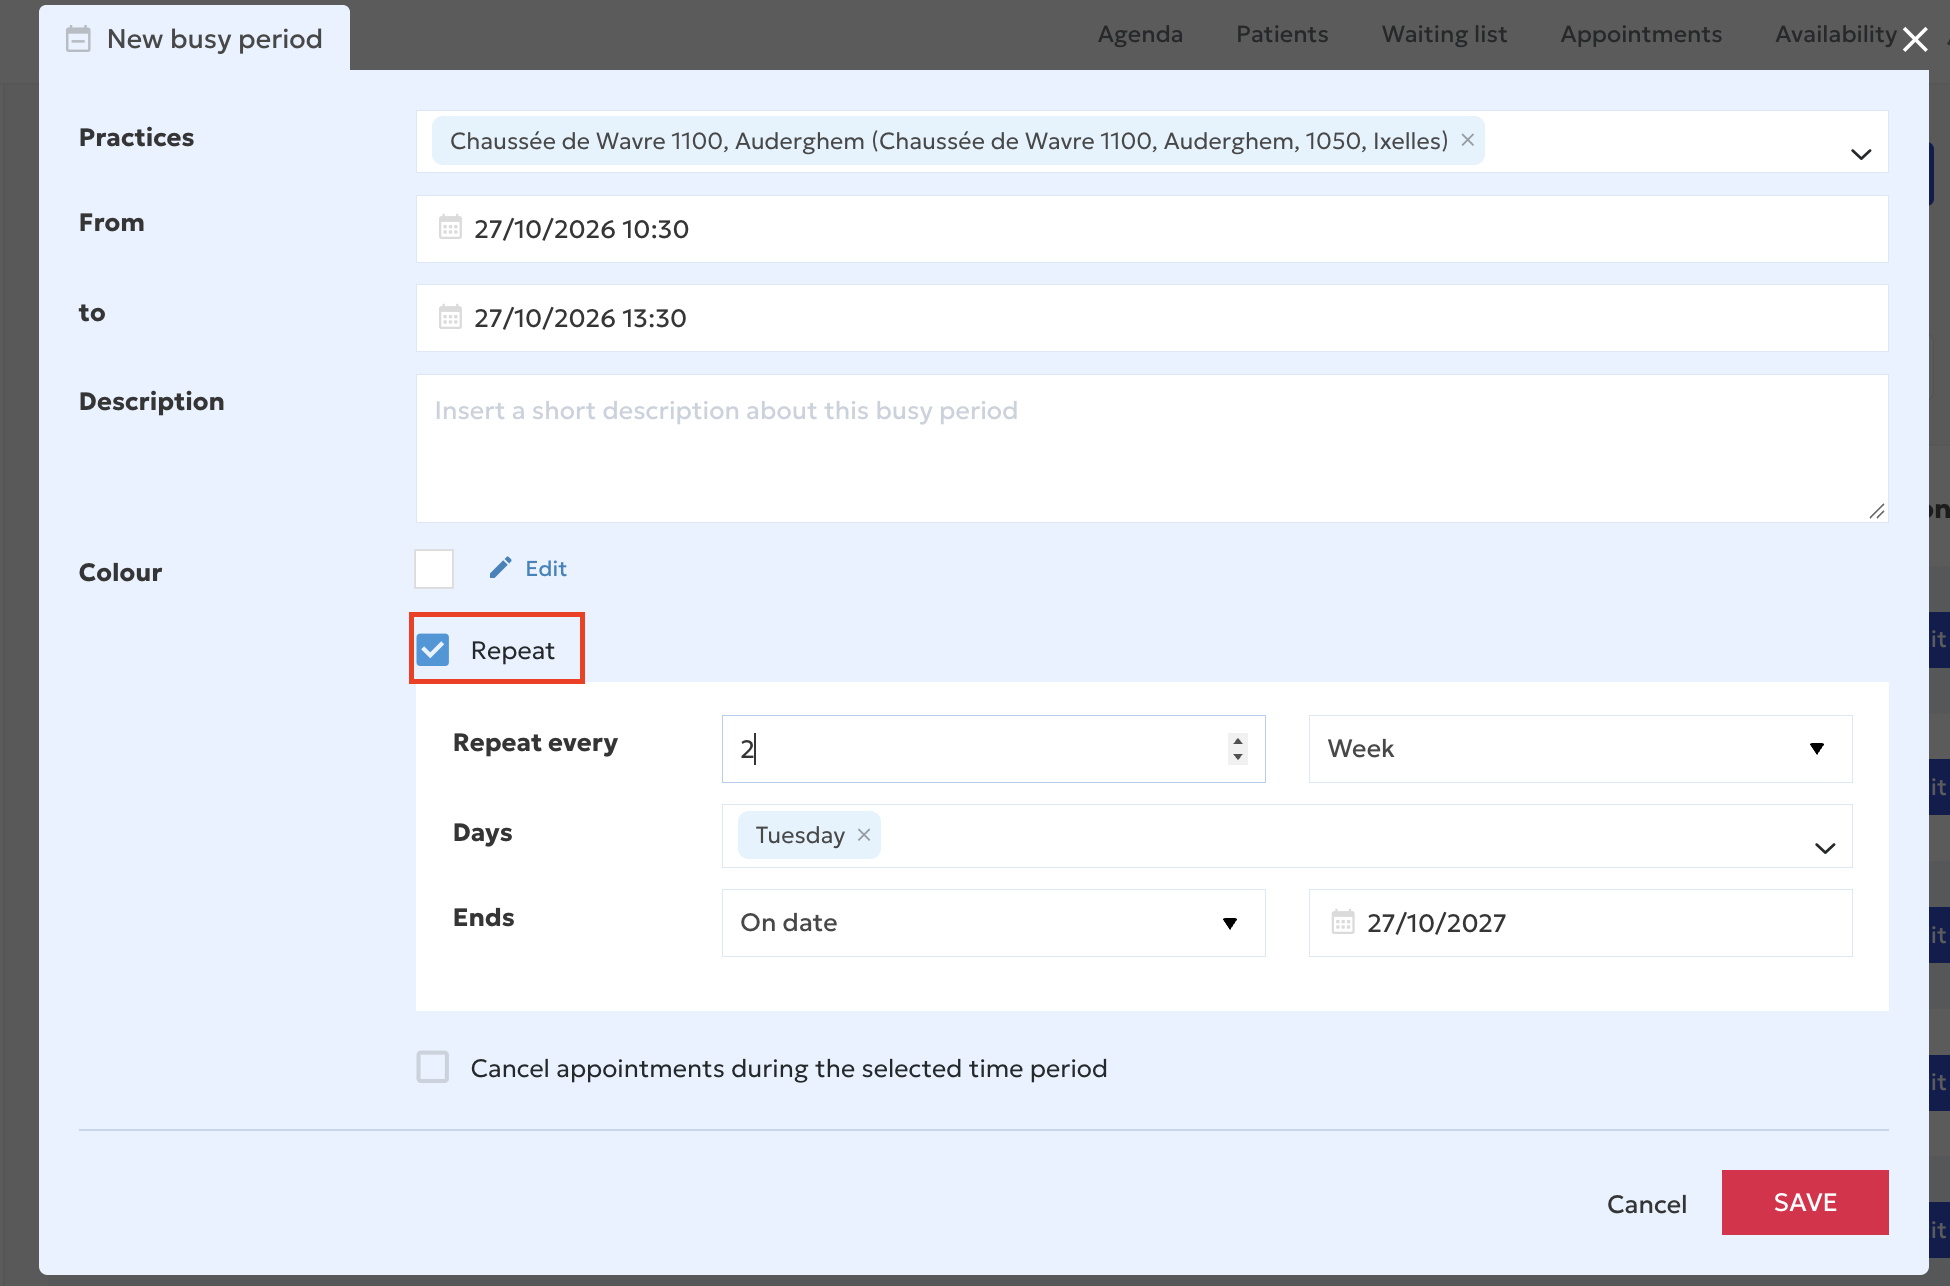
- In your unavailability settings, click « Repeat ».
- Choose the frequency: daily, weekly, monthly or yearly.
- Customize the recurrence as needed, including by selecting the relevant days.
- Specify when the recurrence should end:
- On a specific end date.
- After a set number of repetitions.
- Click « Save ».
Your unavailability will repeat automatically according to the selected settings.
For example, if you do not work every other Monday, you can create unavailability that repeats every two weeks.
- Cancel appointments during unavailability
When you add unavailability, you can also cancel appointments already scheduled during that period.
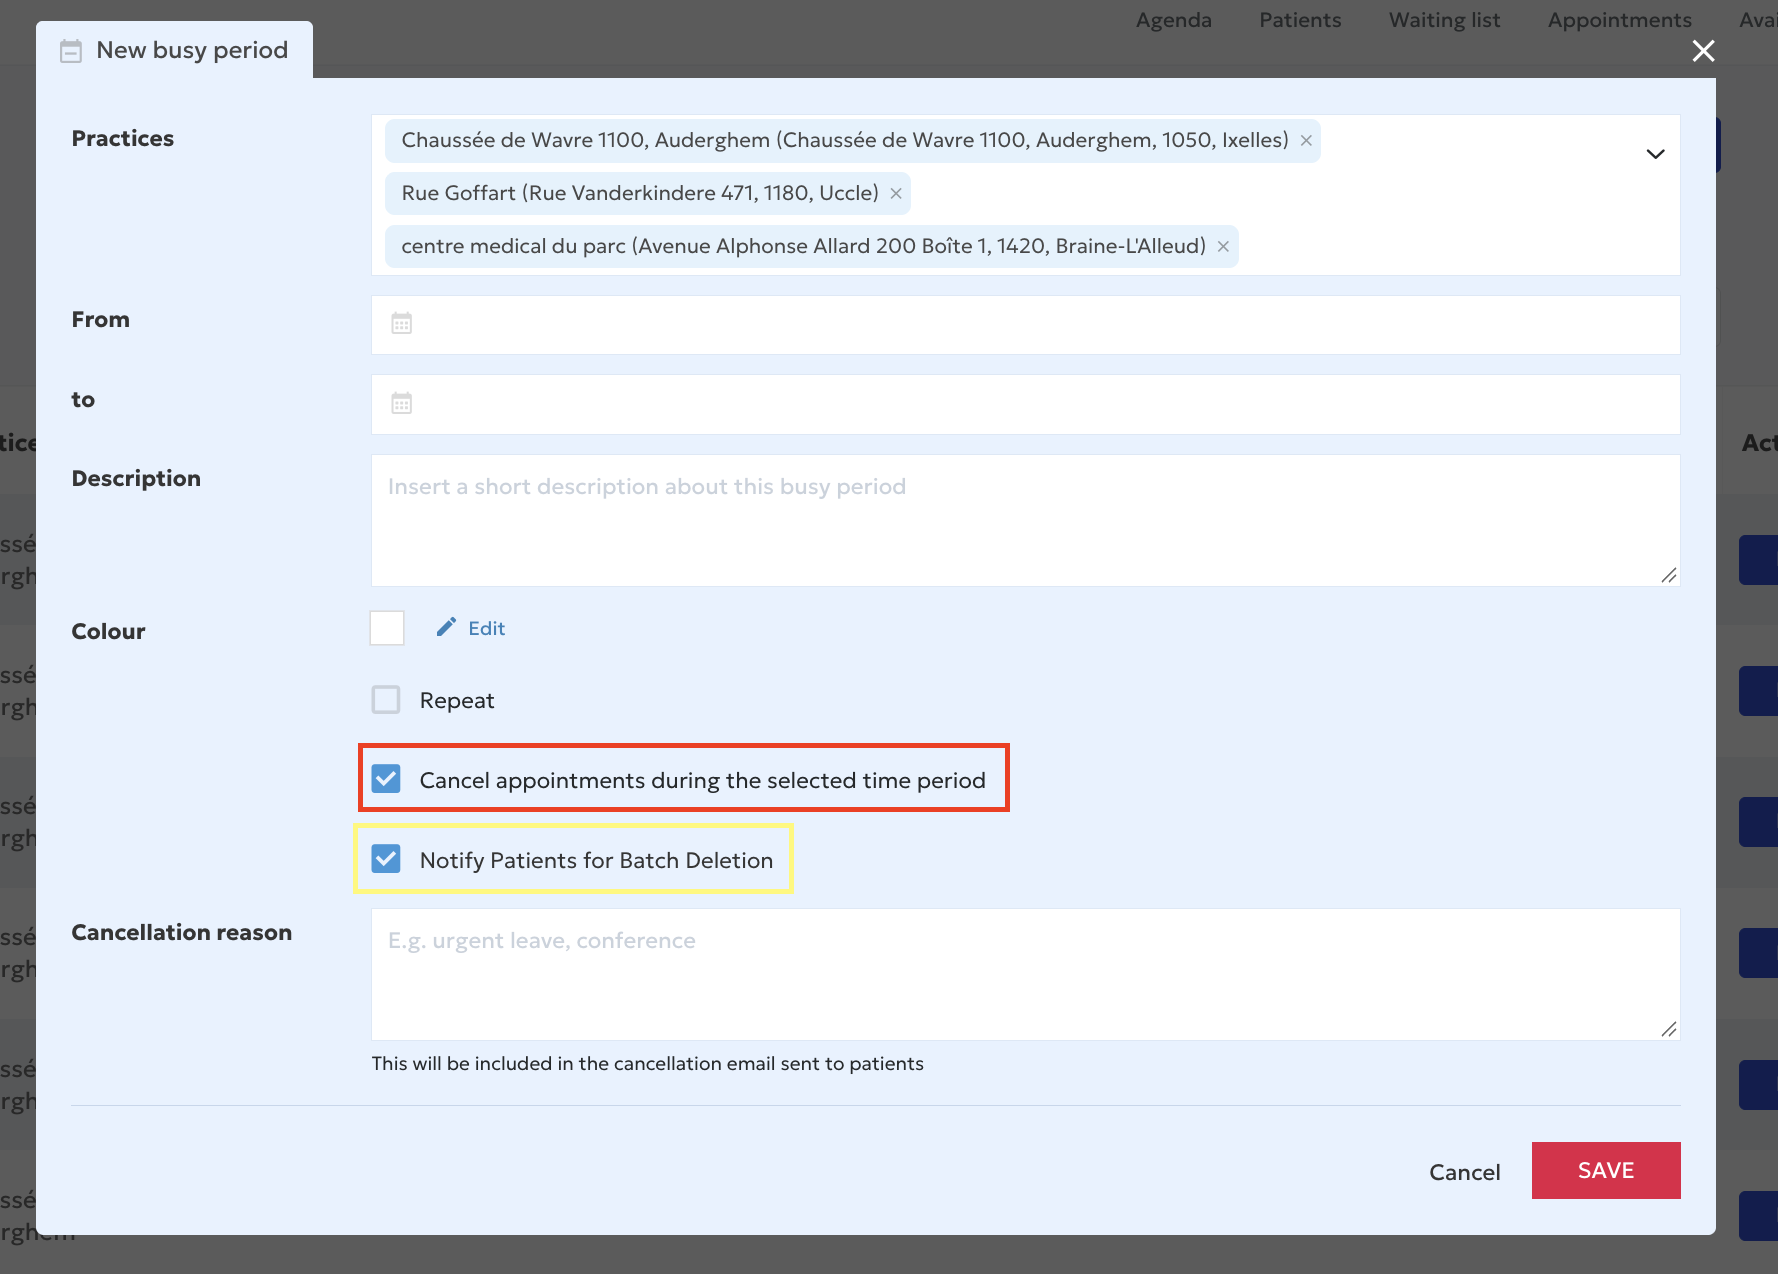
To do this, select « Cancel appointments during the selected period ».
Important: if you enable this option, all appointments already scheduled during the selected period will be canceled when you save the unavailability.
How can you notify the affected patients?
When you select the appointment cancellation option, a new setting appears: « Notify patients ».
- Select « Notify patients ».
- Write your message in the text field provided.
- Click « Save ».
Affected patients will automatically receive a cancellation email including your personalized message.
This option is especially useful if you need to cancel several appointments due to an unexpected absence.
- Add unavailability directly from your agenda
You can also block time slots directly from your agenda without opening the « Availability » tab.
There are two ways to do this.
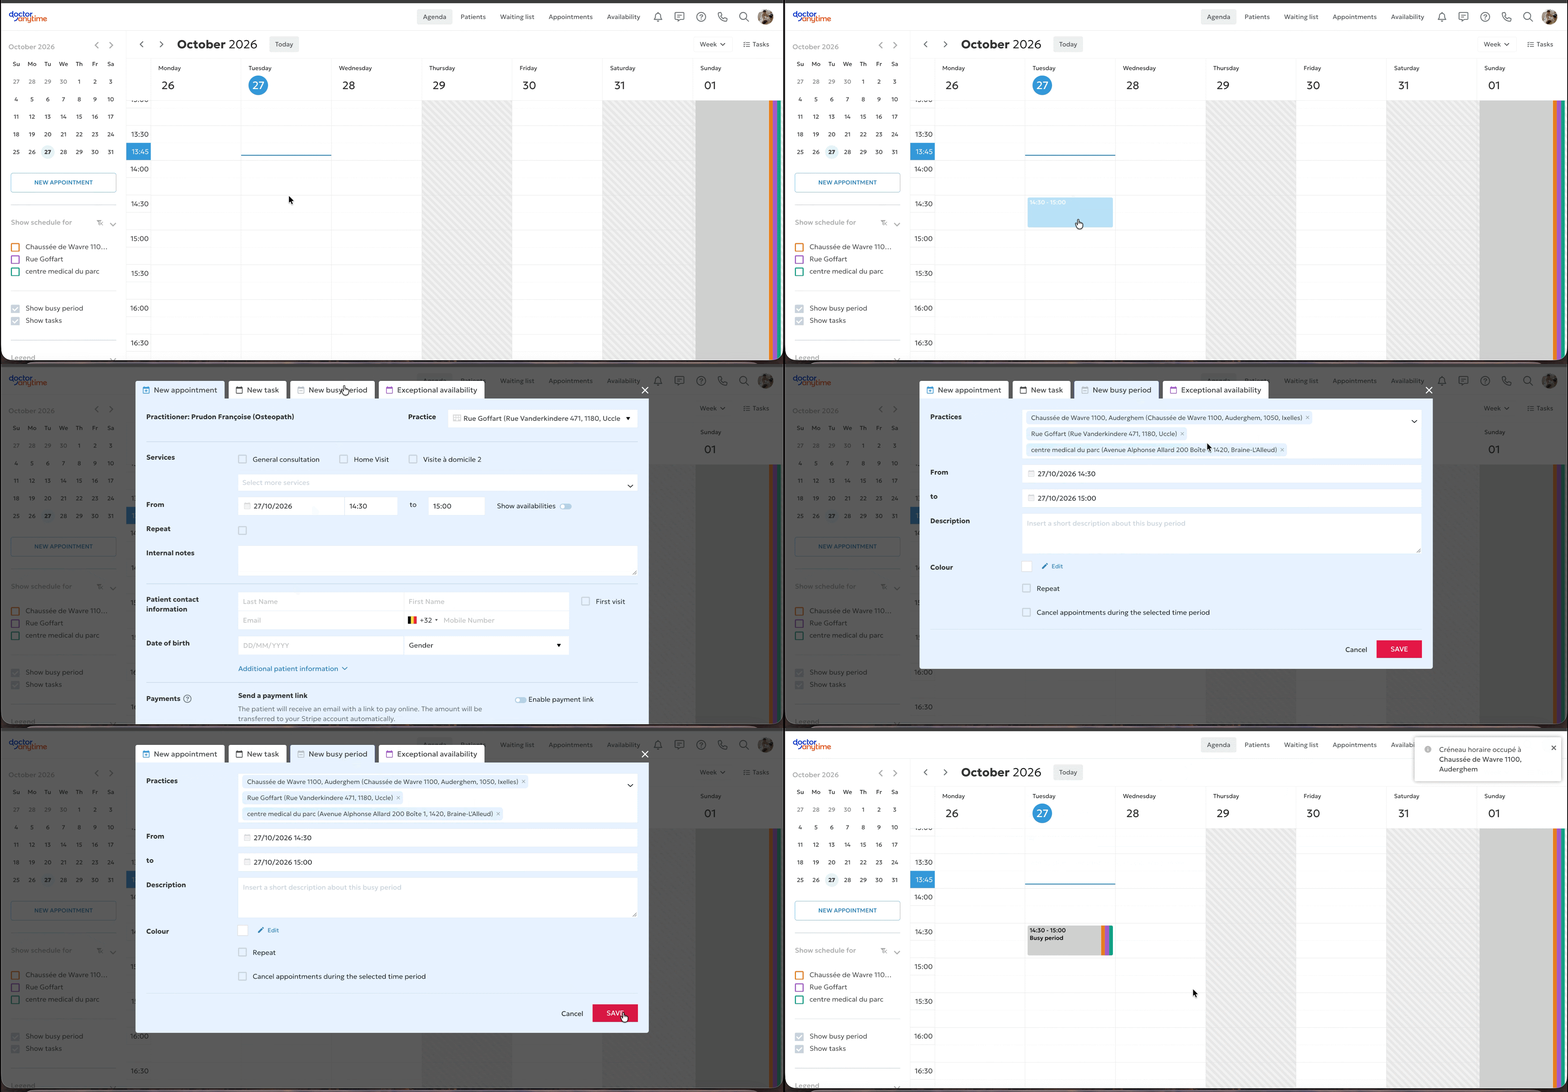
Option 1: Click the desired time
- Open your Doctoranytime agenda.
- Click the space corresponding to the date and time you want to block.
- In the menu that appears, select « Unavailability » at the top of the window.
- Check and adjust the start and end dates and times.
- Configure the various settings for your unavailability.
- Click « Save ».
Option 2: Select a time range directly
- Open your Doctoranytime agenda.
- Click the time when you want the unavailability to start.
- Hold down the mouse button and drag to the desired end time.
- Release the mouse button and select « Unavailability ».
- Check the selected times and settings.
- Click « Save ».
The unavailability will be added to your agenda for the selected period.
- View, edit or delete unavailability
You can find all your unavailability entries in the « Unavailability » tab.
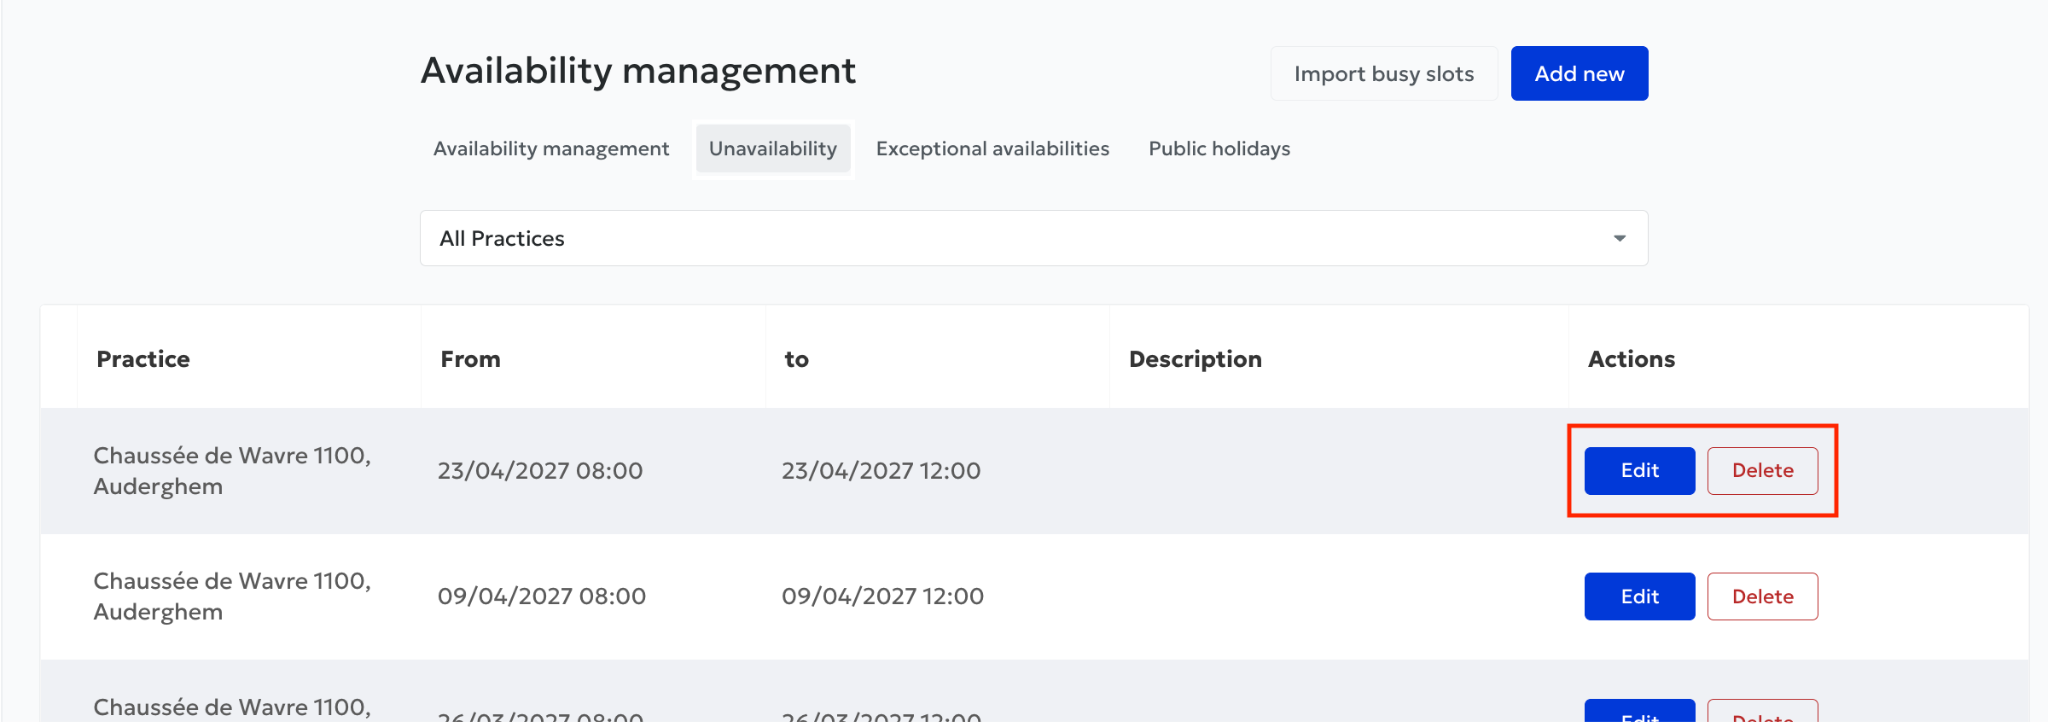
To access it:
- Go to the « Availability » tab.
- Click « Unavailability » above your practice address.
- Find the list of your saved unavailability entries.
From this page, you can:
View your existing unavailability entries.
Edit an entry to change its dates, times or settings.
Delete an entry you no longer need.
You can also edit unavailability directly from your agenda without opening the « Unavailability » tab.
Simply click the relevant unavailability entry in your agenda. You can then edit its settings and save your changes.
- Import multiple unavailability entries from an Excel or CSV file If you already have a list of periods to block, you can import them directly into Doctoranytime using an Excel or CSV file.
This lets you add multiple unavailability entries without entering them one by one.
How do you import unavailability?
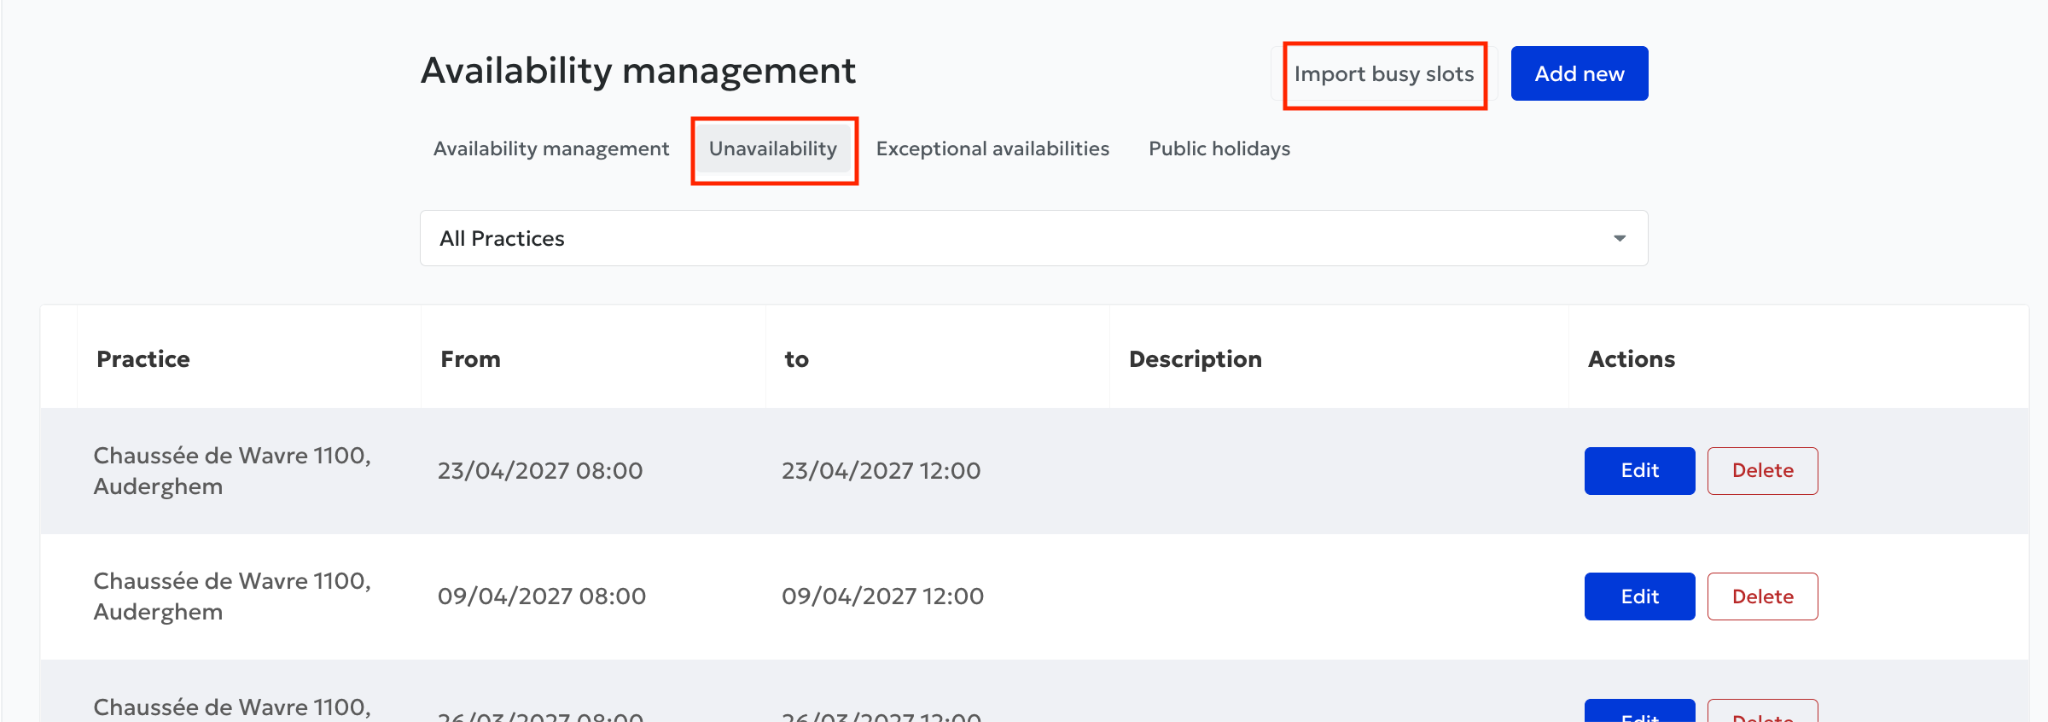
- Go to « Availability », then « Unavailability ».
- Click « Import unavailability » at the top right.
- Select your Excel or CSV file.
- Choose the practice into which you want to import the unavailability entries.
- Click « Import unavailability ».
How should you prepare your file?
Your file must follow a specific format for the unavailability entries to be imported correctly.
It must include at least the following columns:
FromTime: the start date and time of the unavailability.
ToTime: the end date and time of the unavailability.
You can also add other columns with additional information you want to display on your unavailability entries.
Once the file is imported, the relevant periods will be added to your agenda.
Good to know: check your agenda after importing to make sure all unavailability entries were saved correctly.
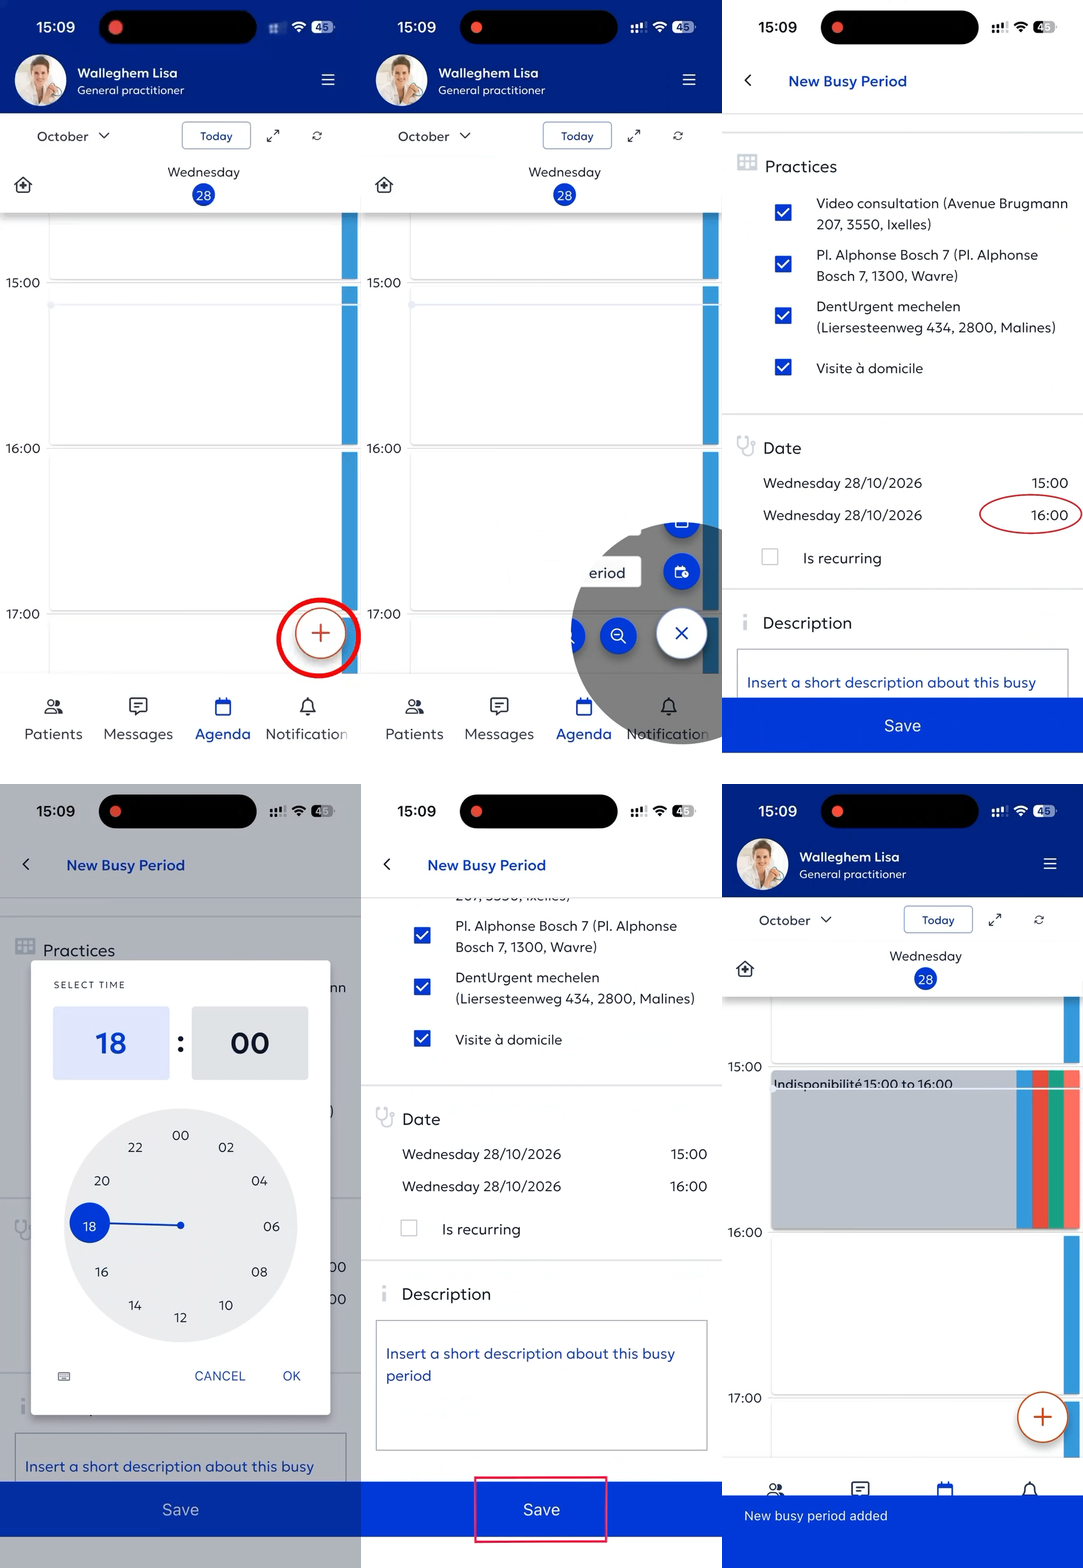
Add unavailability from the mobile app
You can also add unavailability directly from the Doctoranytime app.
To do so:
- Open your Doctoranytime app.
- Tap the « + » button at the bottom right of the screen.
- Select « New unavailability ».
- Choose the relevant practice.
- Enter the start and end dates and times of your unavailability.
- If needed, set up recurrence for your unavailability.
- Add a description to identify the unavailability in your agenda.
- Tap « Save ».
The unavailability will be added to your agenda for the selected period.
Important: the option to automatically cancel already scheduled appointments during unavailability is not available in the mobile app.
If you want to cancel the affected appointments and notify your patients, you must do so from the Doctoranytime web version.