
Would you like to add availability to your Doctoranytime agenda so patients can book appointments? Here is how to set up time slots and customise booking options.
- Access your availability
- Log in to your Doctoranytime agenda.
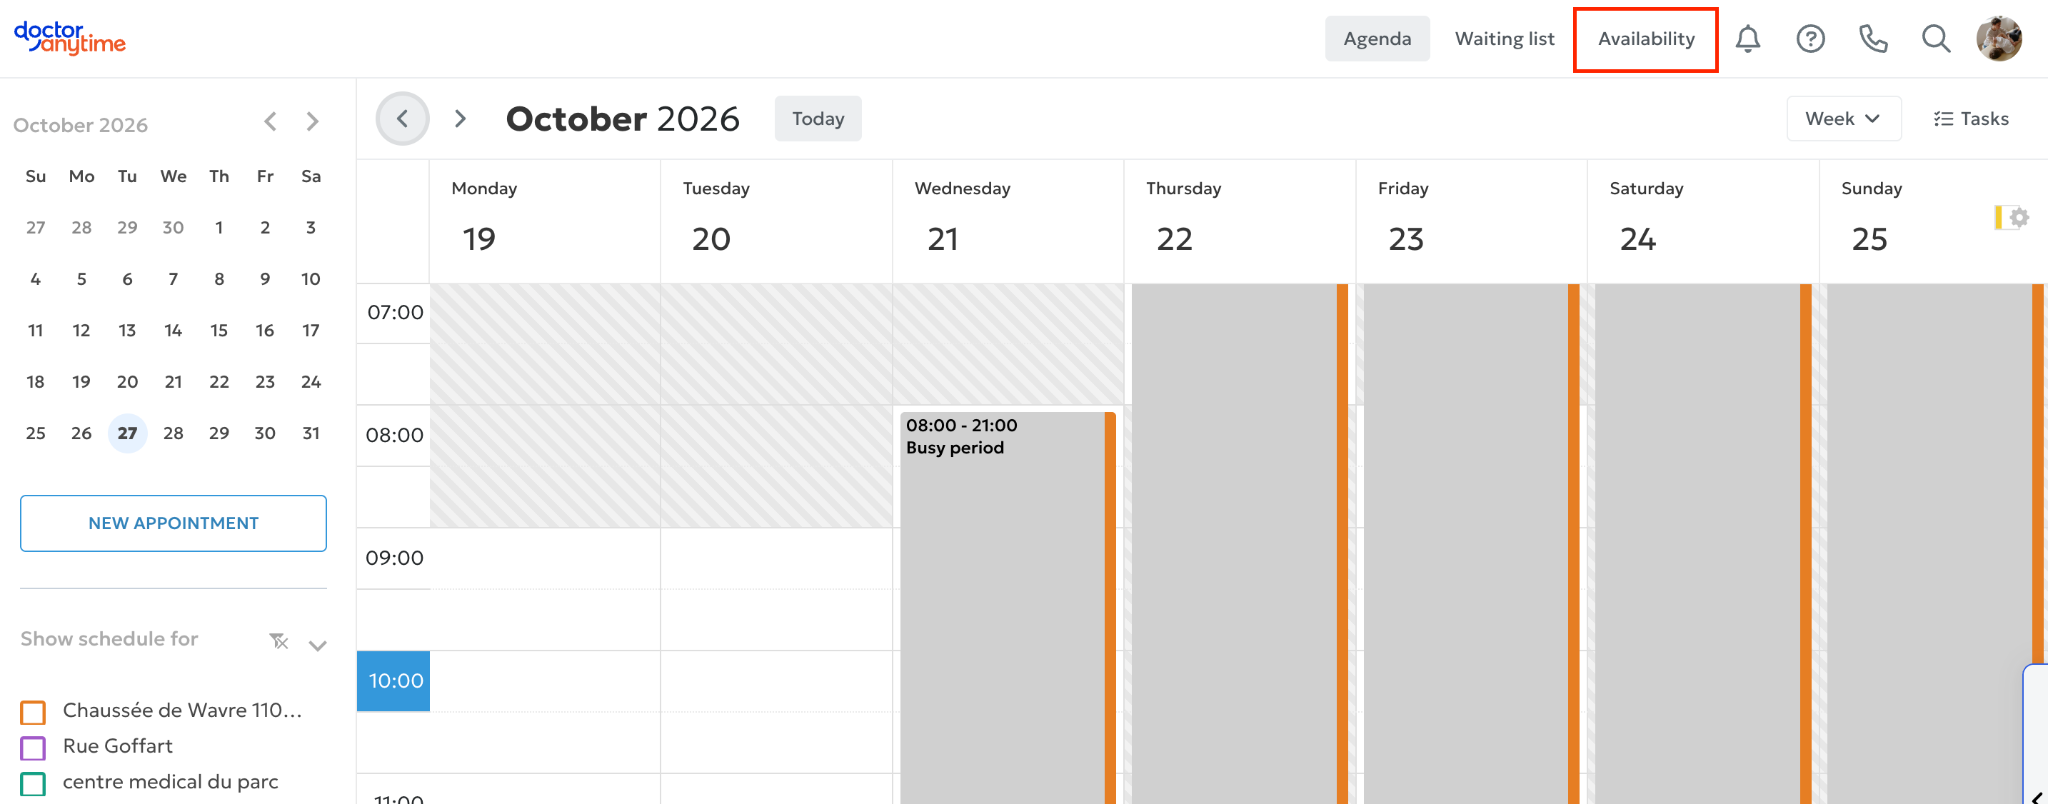
- Click the ‘Availability’ tab at the top right of your agenda.
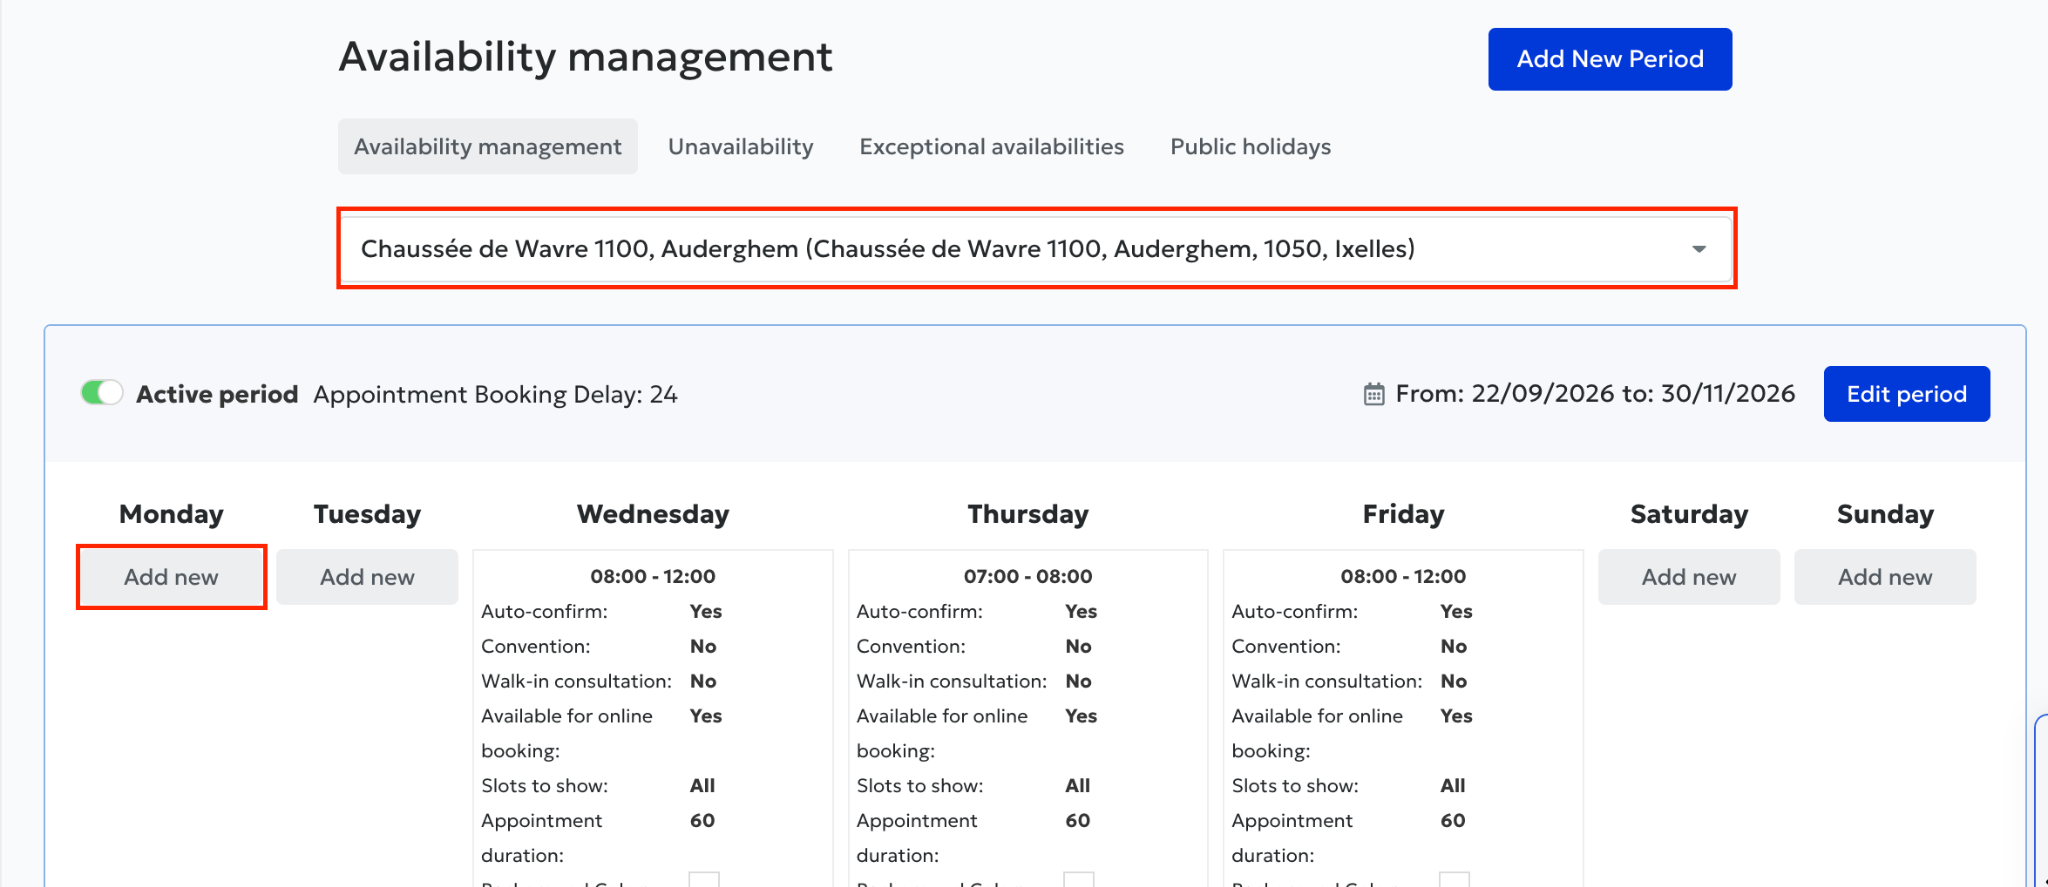
- Select the practice where you want to open availability.
- On the desired day of the week, click ‘Add new’.
You can now configure your time slot. The hours you set under ‘Availability’ are recurring hours: they repeat automatically every week.
You only need to configure them once. They will remain active each week without having to enter them again.
You only need to change this availability if your usual schedule changes.
If you need to add or block a slot on a specific day, use ‘Unavailability’ or ‘Exceptional availabilities’.
- Set your time slot hours
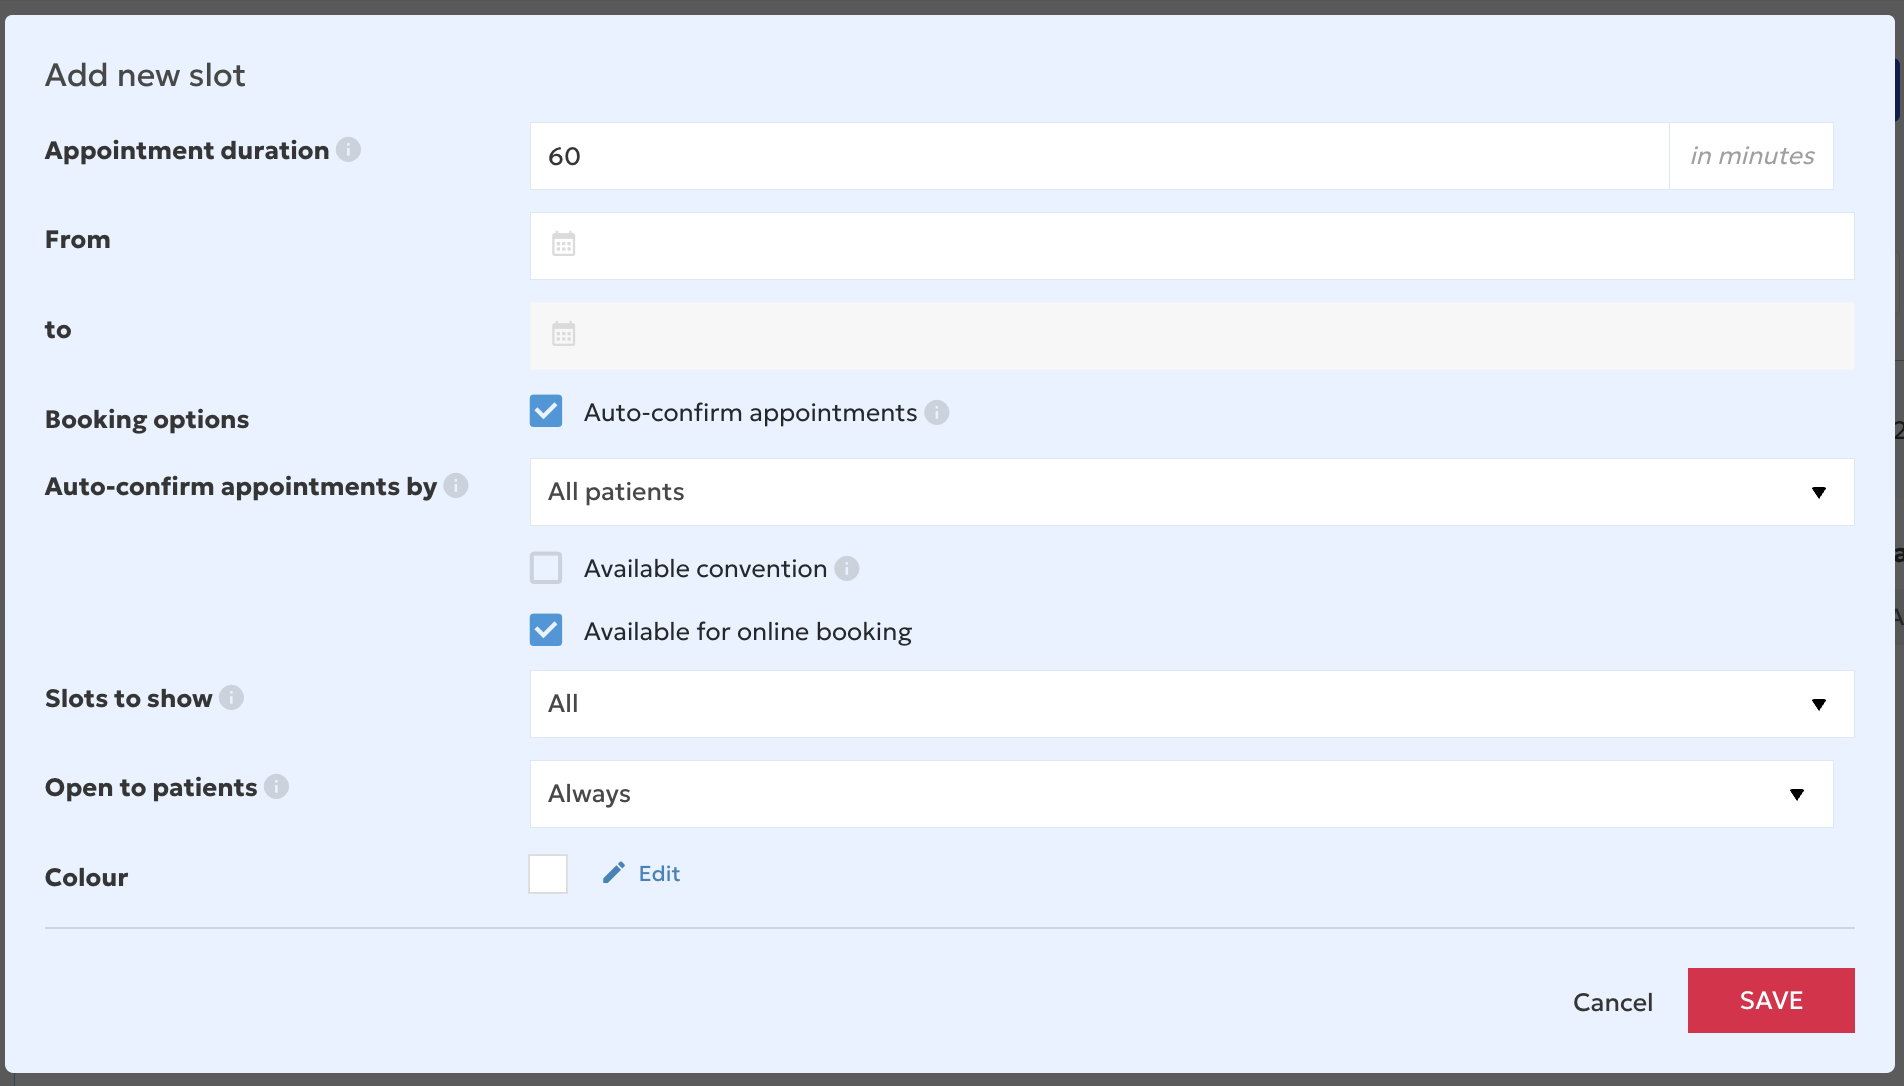
Average appointment duration
This setting determines the interval between appointment start times offered to patients.
For example, if you choose 30 minutes, appointments can be offered every 30 minutes: 9:00, 9:30, 10:00, 10:30, and so on.
Start time
Enter the time when you start consultations during this slot.
End time
Enter the time when you finish consultations.
Please note: this is the end time of the slot, not the start time of the last appointment.
How do you schedule a lunch break?
If you want a break from 12:00 to 13:00 every week, create two separate time slots:
- A first slot from 8:00 to 12:00.
- A second slot from 13:00 to 17:00.
This automatically creates a break from 12:00 to 13:00 every week.
- Choose how appointments are confirmed
In the booking options, you can enable or disable ‘Auto-confirm appointments’.
Automatic confirmation enabled
When a patient books an available slot, the appointment is automatically confirmed both in your agenda and for the patient.
You can apply automatic confirmation to:
All patients: all appointments are confirmed automatically.
- Existing patients only: only patients already in your database who also have a Doctoranytime account are recognised as existing patients when booking.
New patients only: automatic confirmation applies to patients not yet in your database.
Good to know: a patient added manually to your database who does not have a Doctoranytime account will not automatically be recognised as an existing patient when booking online.
Automatic confirmation disabled: manual confirmation
If you untick this option, appointments will require your approval.
When a patient requests an appointment:
- The time slot is temporarily blocked in your agenda.
- A small yellow dot appears on the appointment to show that confirmation is pending.
- You can click the appointment to confirm or delete it.
- You also receive an email allowing you to confirm the request.
If you delete a pending appointment, the slot becomes available for another patient to book.
- Configure other booking options
Available convention
Tick ‘Available convention’ if you offer consultations under the convention.
Available for online booking
Enable this option if you want patients to be able to book online during this slot.
If it is unticked, this time slot will not be available for online booking.
- Choose which slots patients see
The ‘Slots to show’ setting determines how your availability is offered to patients.
There are four options.
Option 1: All slots
All available slots within the period are offered to patients.
For example, for a period from 12:00 to 17:00 with 30-minute intervals, patients can choose 12:00, 12:30, 13:00, 13:30, and so on.
Option 2: First availability of the period
Only the first available slot in the period is offered.
For example, for a period from 12:00 to 17:00:
- The first patient can book at 12:00.
- Once that slot is booked, 12:30 becomes available.
- Then 13:00, and so on.
This gradually fills your agenda from the beginning of the period.
Option 3: Last availability of the period
This works like the previous option, but starts at the end of the period.
For example, for a period from 12:00 to 17:00 with 30-minute intervals:
- The first patient can book at 16:30.
- Once that slot is booked, 16:00 becomes available.
- Then 15:30, and so on.
This gradually fills your agenda from the end of the period.
Option 4: Closest availability
With this option, the first patient can choose freely from all available slots in the period.
Once that appointment is booked, only slots directly adjacent to existing appointments are offered to subsequent patients.
For example:
- The first patient books at 15:00.
- The second patient can book at 14:30 or 15:30.
- Availability then changes according to the appointments booked.
This is particularly useful if you want appointments back-to-back and wish to avoid gaps between consultations.
If you offer consultations of different lengths, such as 30 and 60 minutes, these settings may sometimes:
- Limit the slots offered to patients.
- Create gaps between appointments despite automatic grouping.
If you offer services with different durations, we recommend ‘First availability of the period’.
- Set how far in advance patients can book
The ‘Open to patients’ setting determines how far in advance your availability can be booked online.
By default, this is set to ‘Always’, allowing patients to book up to three months in advance.
You can also choose another period, for example:
- The same day.
- 1 day in advance.
- 2 days in advance.
- 30 days in advance.
- 60 days in advance.
Other options are available depending on your needs.
- Customise your time slot colour
You can assign a colour to a time slot to organise your agenda more clearly.
This colour appears in the background of the slot in your agenda.
Please note: only you can see this colour. Patients do not see it when booking online.
For example, if you work at several practices, you can assign a different colour to each location to identify it quickly.
- Save your time slot
Once you have configured all settings, click ‘Save’.
Your time slot will be added to your availability with the selected settings.
Repeat these steps to add other time slots, consultation days or practices.
- Edit, duplicate or delete a time slot
Once saved, the time slot appears under the selected weekday in ‘Availability’.
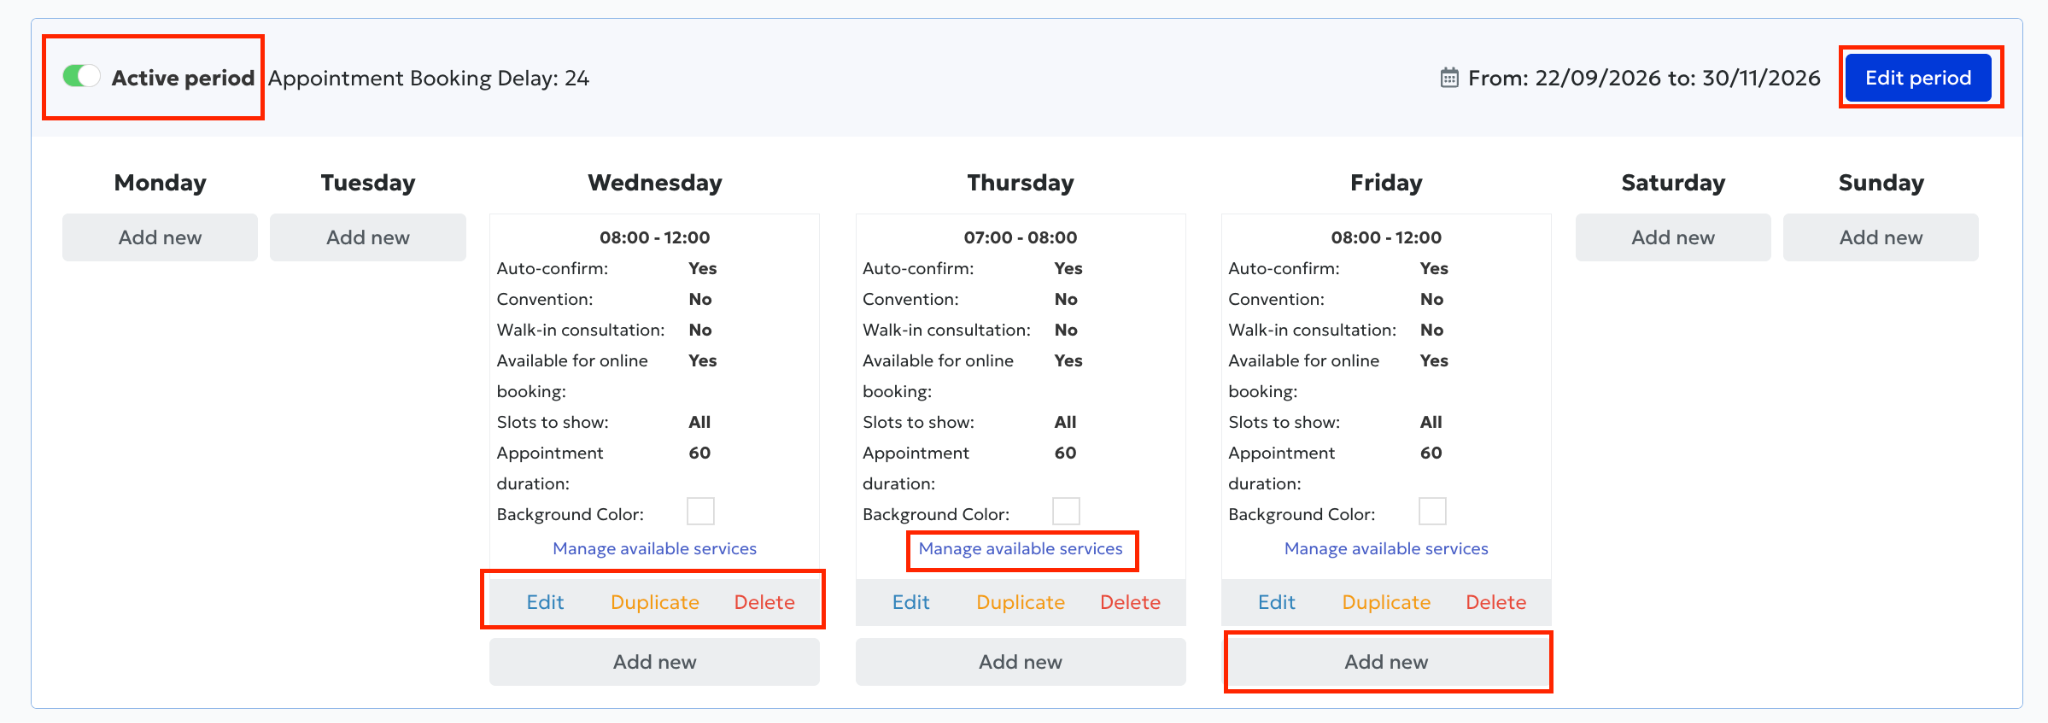
Several options appear below this slot:
Edit: change the slot settings, such as start and end times, confirmation mode or displayed availability.
Duplicate: copy an existing slot to other weekdays without reconfiguring all settings.
Delete: remove the time slot so patients can no longer book it.
- Choose which services are offered in a time slot
‘Manage available services’ lets you decide which services patients can book during a specific time slot.
For each service, there are three options:
Available for the entire time slot: the service can be booked throughout the period.
Available only during the selected time slot: the service is offered only in the selected, customisable slot.
Unavailable: the service cannot be booked during this period.
This allows you to tailor the services offered to your hours and working arrangements.
- Add several time slots on the same day
Below your existing time slots, you will also find ‘Add new’.
This lets you add another time slot on the same day.
This is particularly useful if you want to:
- Schedule a lunch break.
- Add breaks between consultations.
- Set several slots with different settings on the same day.
For example, create a slot from 8:00 to 12:00 and another from 13:00 to 17:00, leaving a break from 12:00 to 13:00.
- Change the availability period of your agenda
Under ‘Availability’, you will find the blue ‘Edit period’ button at the top right, usually above Saturday and Sunday.
This button lets you define the period during which patients can book your availability.
Period start date
You can set the date from which your slots will be available.
For example, if you set 1 December as the start date, patients can book before then, but the first offered appointments will be on or after 1 December.
Period end date
There are two options:
No end date: your availability remains open without a defined end date.
Set an end date: slots are offered only until the selected date.
- Set the minimum appointment booking delay
You can also set the minimum appointment booking delay through ‘Edit period’.
This determines how far in advance a patient must book an appointment.
Example:
If you set a minimum delay of 2 hours:
- A patient who logs in at 8:00 can book from 10:00 onwards.
- An appointment starting before 10:00 cannot be booked.
You can customise this delay starting from 0 hours.
Click ‘Save’ to apply your settings.
- Enable or disable a practice’s availability
Under ‘Availability’, above Monday next to ‘Active period’, you will find an ON/OFF switch.
This switch lets you show or hide all availability for the selected practice.
ON: the practice’s time slots are displayed and can be booked online.
OFF: all time slots for the practice are hidden and cannot be booked online.
Please note: this setting applies to all time slots for the selected practice, not to a single slot.
To allow online bookings for this practice again, switch it back ON.